
Background
I’m a platform admin tasked with running a multi-tenant application on GKE. This leaves me with a couple of fundamental things to do:
- I need to create the GKE cluster where every tenant’s app will be deployed.
- I need to create the policies, namespaces etc. that will govern every tenant. For example: every tenant gets their own GKE namespace in a large shared cluster
- I should be able to put all my platform level GKE configurations into a git repository and keep them in sync with cluster
- For every tenant, I will create a new git repository per tenant - this will be used to hold the application code for every individual tenant, the namespace in the GKE cluster where every individual tenant’s apps will be deployed, the synchronization b/w this tenant git repository, and the tenant namespace on the GKE cluster.
Any automation to setup the various components can be done using several pieces of technology like terraform, KRM, Crossplane, Cloud Build etc., but for the purpose of keeping this fairly high level, we’ll stick to the basics and not use any of those automation tools at the moment.
What are we going to be doing
Terminology
Admin: This is the person responsible for the platform as a whole. This is the person who creates policies and resources that are common across the kubernetes cluster, and apply to all tenants. This admin is NOT responsible for deploying the code that is used by every individual tenant.
App Owner: This is the person responsible for the particular tenant. This person deploys an instance of the application that will be used by the particular tenant.
Root Repo: This is a git repo where the components set up by the Admin are kept. App Owners do not have access to this.
Namespace Repo: This is a git repo for a particular tenant, a different git repo for every tenant. So let’s say you have 2 customers A, and B. Both of these will be 2 individual tenants, and will have their own respective git repos called Namespace Repos.
Construct
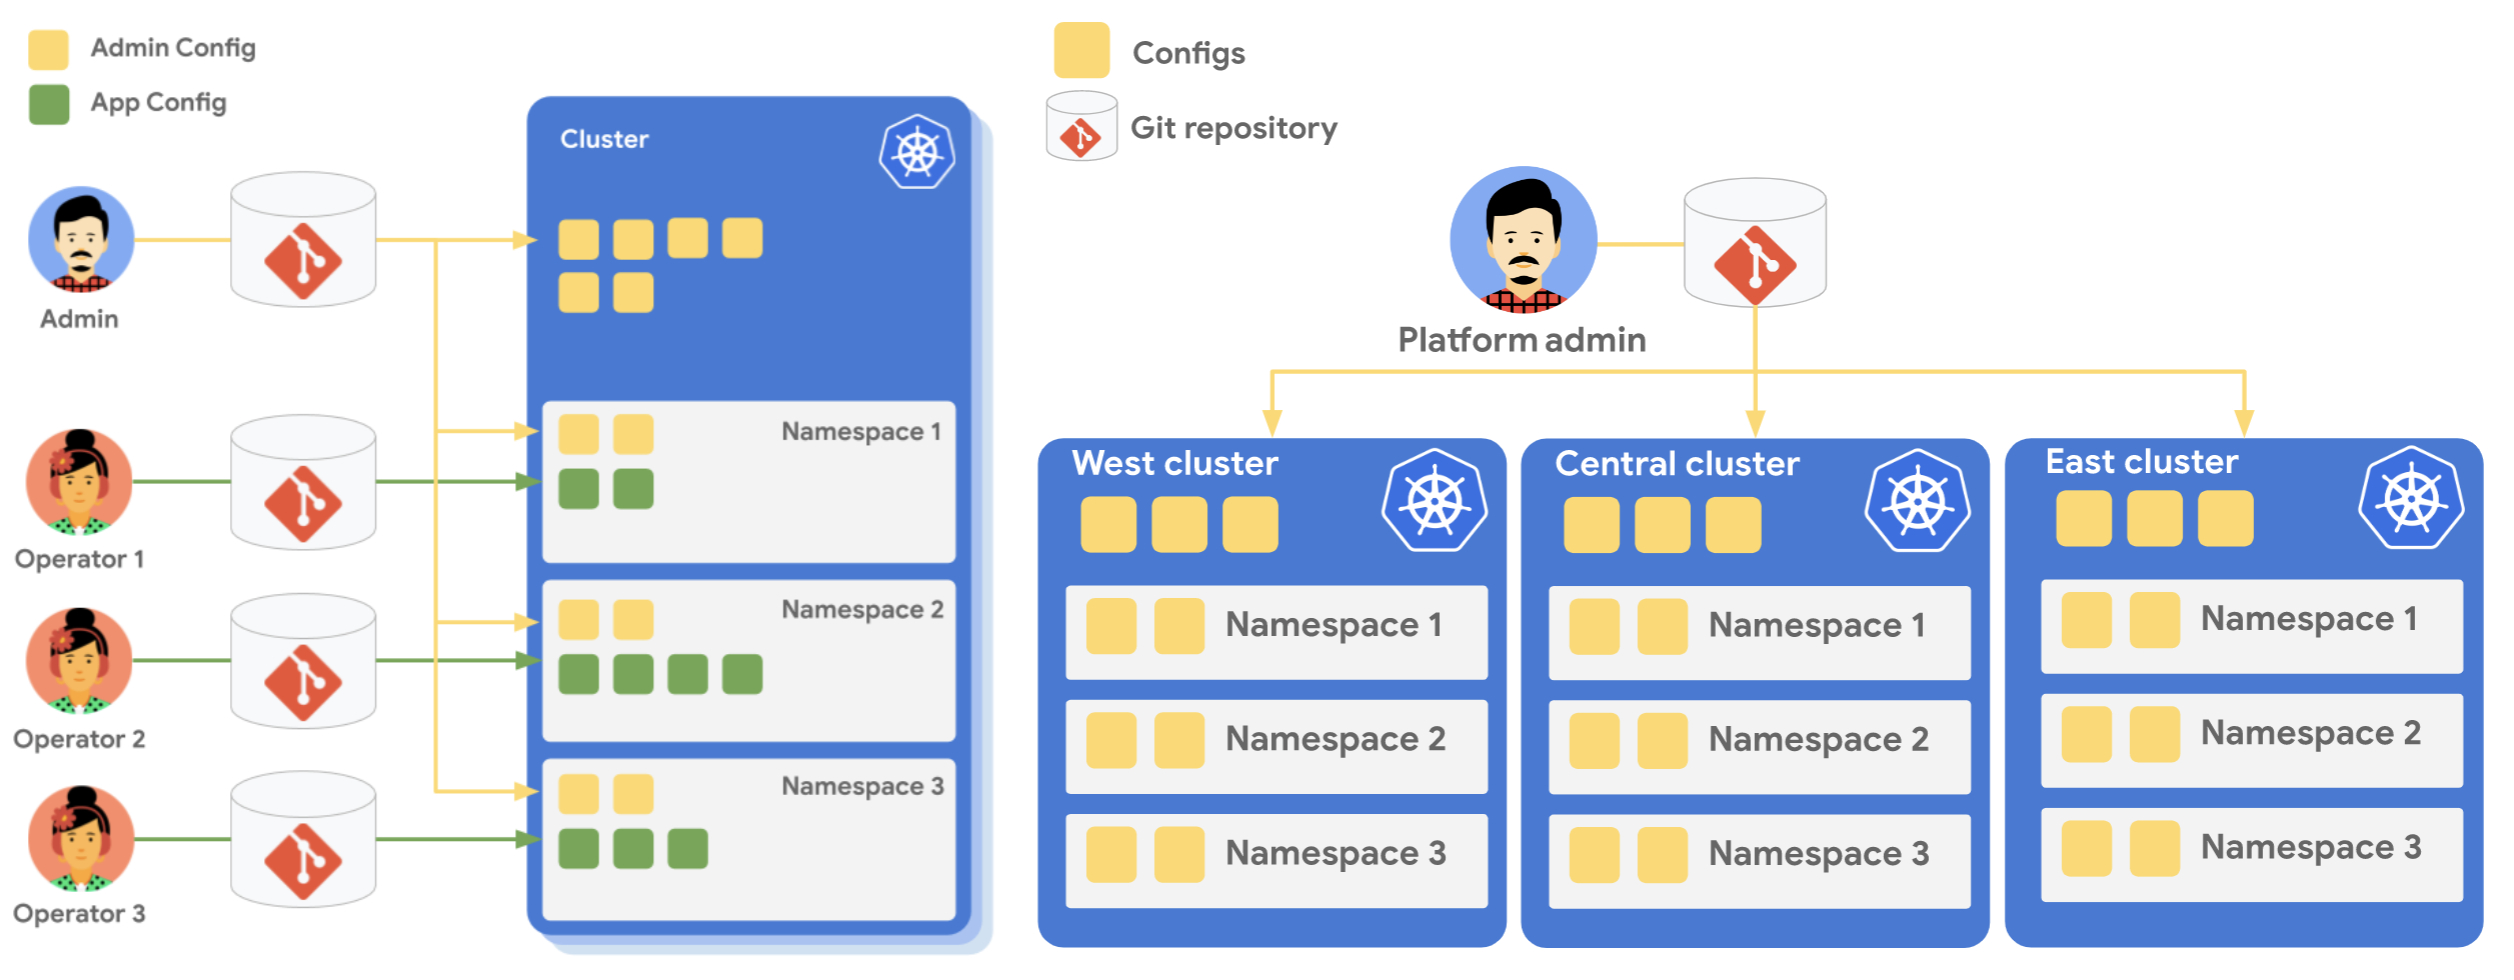
The admin creates the cluster where every tenant’s code will live. All of the Admin’s configuration will go into one single git repository, the root repository, and will reside inside one single namespace called admin-ns. On receiving a request to onboard a new tenant to the cluster, the admin creates a new folder in their git repository (the root repo) for the tenant, and puts in a namespace yaml file, and a role binding for that tenant in that namespace folder. This ensures that the namespace and the role binding for the individual tenant are always synced in the cluster, and any tenant cannot delete it.
The admin then creates a new repository for the tenant called the namespace repo, and adds the configuration to sync this repo, with the namespace created for the particular tenant. This syncing is again controlled by the admin, and nobody should have the permission to remove this sync. Hence these components must also go into the root repo, in the particular namespace folder, maintained by the admin.
The admin then gives access to this new repo, the namespace repo, to the App Owner. The app owner then adds the tenant specific code, into this namespace repo so that the app resources deployed in the k8s cluster for this tenant are always in sync with the resources in the namespace repo.
There are other ways to structure this as well, which are explained and demonstrated in the official Anthos documentation here.
Setting up your environment
This guide will use a bunch of env. variables across the yaml and commands to help simplify the whole process. Let’s set them up here.
export PROJECT_ID=$(gcloud config get project)
export CLUSTER_NAME=my-cluster
export COMPUTE_REGION=us-central1
export NAMESPACE=admin-ns
export KSA_NAME=root-reconciler
export GSA_NAME=my-gsa
export TENANT_NAME=tenant-1
Creating GKE cluster
Leveraging workload identity on the GKE cluster enables communication b/w the Git repository on GCP using a service account instead of tokens or ssh keys, and is hence the recommended way of doing it. Let’s try and simplify this.
-
Normally, in order for the GKE cluster to speak to another service that requires authentication, you’d normally need to import the credentials into the cluster as a kubernetes secret.
-
With workload identity, you first create a service account on Google cloud identity, and give it permissions to access the other service (for example Cloud Build, Cloud SQL etc.), then create a service account inside the kubernetes cluster and give it the appropriate kubernetes roles, and then link the googler service account to the kubernetes service account you created. As a result, all resources leveraging the kubernetes service account we created earlier, get the same access permissions as the google cloud service account we created earlier.
In order to configure access using service accounts as mentioned above, a capability on the GKE cluster needs to be enabled first. This capability is called Workload Identity, and it greatly simplifies Authentication and Authorization between GKE and other google cloud services.
- Create a regular public GKE cluster but ideally with Workload identity enabled on the GKE cluster and the GKE Metadata server on the worker node pool.
gcloud container clusters create $CLUSTER_NAME \ --region=$COMPUTE_REGION \ --workload-pool=$PROJECT_ID.svc.id.goog - If the cluster already exists, enable Workload identity on the cluster level and the GKE metadata server on the nodepools.
  gcloud container clusters update $CLUSTER_NAME \
  --region=$COMPUTE_REGION \
  --workload-pool=$PROJECT_ID.svc.id.goog
You would then have to figure out the name of the nodepool in the cluster where you’re attempting to enable workload identity. The following command will enable worklopad identity on the nodepool, however when this happens, the nodes in the node pool will stop using the default compute service account, which could cause disruption to existing workloads.
The simplest way to get the name of the nodepool is to navigate to the GKE cluster on the GCP UI, click on the name of the Cluster –> Nodes, and copy the name of the nodepool from there.
  gcloud container node-pools update NODEPOOL_NAME \
  --cluster=$CLUSTER_NAME \
  --workload-metadata=GKE_METADATA
In your cloud shell (we’re assuming you’re using it for the purpose of this demo), get access to the kubernetes cluster you just created using the following command:
gcloud containers cluster get-credentials $CLUSTER_NAME --region=$COMPUTE_REGION
Ready Cloud Shell to work with the source repo
- Create a repo on Cloud Source Repo from the GCP UI.
-
Generate an ssh key on the cloud shell environment to be able to push and pull from this repo we just created.
ssh-keygen -t rsa cat ~/.ssh/id_rsa.pub -
On the cloud source repo page, click on the 3 dots on the top right on the page, click on Manage SSL keys and create a new key, give it a name and paste the ssh key contents from the previous step there.
- Clone the repository using the ssh url to the cloud shell.
-
Add your code to the repo folder
mkdir home touch home/README.md - git add, git commit, add remote and then push the code to the main branch to the cloud source repo.
We will now use this cloud source repo as the repo to sync with the kubernetes cluster using config sync.
Service account setup
This is the service account mentioned in the Creating GKE Cluster section.
- Create a service account in your GCP project using the following command, and give it the appropriate roles on GCP for the job.
 gcloud iam service-accounts create $GSA_NAME --project=$PROJECT_ID
 gcloud projects add-iam-policy-binding $PROJECT_ID --member "serviceAccount:$GSA_NAME@$PROJECT_ID.iam.gserviceaccount.com" --role roles/source.writer
Normally at this point you’d create a service account inside your kubernetes cluster (called KSA), and annotate it with the Google service account (GSA) we just created above. In this case however, since we’re going to be using Anthos Config Management (ACM), it auto-creates the Service account inside the cluster that it uses. So we simply need to annotate this service account created by ACM, with the name of the GSA. We will be doing it in Step 10 in the next section.
Note: The service account we’ve created on the GCP side in the previous step is called the
GSA=Google Service Account. The Service account that’ll be created in the kubernetes cluster is consequently going to be called theKSA=Kubernetes Service Account. Get the analogy?
Configure ACM into the cluster
-
On the Anthos UI, navigate to clusters and select the gray box that asks you to register the un-registered cluster. There, select the cluster we created earlier (which is currently not enrolled in Anthos), and enroll it by clicking on the Register button next to the name of the cluster.

-
Navigate to the config management tab on the left hand side and use the gray box on the top to set up config management for the cluster where it hasn’t been set up. Setup steps as follows.

- Select the cluster on the next screen and hit continue.
- You can unselect Policy Controller for now and hit continue
- Keep the Enable config sync checkbox selected and select custom from the dropdown menu.
- In the URL field, put the HTTPS protocol URL for the repo in the Cloud Source Repo. Do not put the ssh url since we’re using Service account as the mode of authentication, and not ssh keys.
- Click on Advanced Settings and select Authentication type as Workload identity. In the service account email field, mention the service account email ID from the previous step.
- Set configuration directory to
home/ - Select the latest version of ACM and click Complete at the bottom to start the installation.
-
The Ui will show an error right now, and that’s ok because the service account created inside GKE isn’t connected to the GCP service account we created earlier, and hence the Config Sync component in the cluster doesn’t have the required permissions to read the source git repo.
Note: As per the document, since the
root-reconcilerdeployment is present in theconfig-management-systemnamespace, the name of the KSA isroot-reconciler. Runkubectl get sa -n config-management-system | grep rootto verify.gcloud iam service-accounts add-iam-policy-binding \ --role roles/iam.workloadIdentityUser \ --member "serviceAccount:$PROJECT_ID.svc.id.goog[config-management-system/$KSA]" \ $GSA@$PROJECT_ID.iam.gserviceaccount.com -
With this, the root repository should sync with the home directory in the git repository. To check the status of the repo sync you can use the following command
nomos status
Adding another namespace repo, a tenant to sync
There are 2 models of operations here.
Scenario 1: The admin creates the basic artifacts such as the tenant namespace in the cluster, the synchronization artifacts of the tenant specific git repo, service account role bindings etc.
Scenario 2: you can simply let that be managed by the cluster tenant owner (the app owners or whoever is responsible for deploying the app in the cluster namespace). So the app owner will have to set up the sync, the service account mappings etc.
In this document, we’re covering Scenario 1.
We now intend to add a tenant to the cluster and the git repository to be synced for this tenant is referred to as the namespace repository. The k8s yaml for creating the namespace, relevant admin level artifacts such as network policies, RepoSync configuration for a tenant repository, stay in the root repository, while things such as the deployments, services, ingress etc resources that are specific to a tenant may go in the namespace repo.
Creating a namespace in the cluster for the tenant
This section is performed by an admin, and not the application owners.
-
Add a yaml for creation of the tenant namespace to the root repo in the
home/folder.cat <<EOF > home/$TENANT_NAME/ns-$TENANT_NAME.yaml apiVersion: v1 kind: Namespace metadata: creationTimestamp: null name: $TENANT_NAME spec: {} EOF
Creating a git repo for the tenant
This section is performed by an admin, not an app owner.
- Create a git repo for the tenant from the UI, or using the gcloud CLI as desired.
Make note of the https repo URL for the repo that’s been created. We’ll need it in the next steps to setup the sync. Also, we’ll assume here that the app owners will put the kubernetes manifests in a
manifestsfolder in the root of the repo.
Setting up sync b/w tenant namespace & tenant git repo
This section is performed by an admin, not an app owner.
-
The admin now needs to create a repo sync resource that will sync the resources created in a tenant git repo
tenant-1namespace we created - this repo sync resource is a namespaced resource and needs to be applied into tenant-1’s namespace by the admin.cat <<EOF > home/$TENANT_NAME/reposync.yaml apiVersion: configsync.gke.io/v1alpha1 kind: RepoSync metadata: # There can be at most one RepoSync object per namespace. # To enforce this restriction, the object name must be repo-sync. name: $TENANT_NAME-reposync namespace: $TENANT_NAME spec: # Since this is for a namespace repository, the format should be unstructured sourceFormat: unstructured git: # If you fork this repo, change the url to point to your fork repo: https://source.developers.google.com/p/$PROJECT_ID/r/$TENANT_NAME # If you move the configs to a different branch, update the branch here branch: main dir: manifests/ gcpServiceAccountEmail: $GSA_NAME@$PROJECT_ID.iam.gserviceaccount.com # We recommend securing your source repository. # Other supported auth: `ssh`, `cookiefile`, `token`, `gcenode`. auth: gcpserviceaccount EOF -
Kubernetes Service accounts or KSA’s are namespaced resources and hence the
tenant-1namespace also needs it’s service account to be linked to a GSA (a Google Service Account) so theRepoSyncobject has the permissions to pull the artifacts from the source repository. Note, that this KSA which needs to be attached with the GSA is only created after the RepoSync object has been applied to the cluster.Note: In the case of a
root-repositorysync, the KSA name isroot-reconciler, while in the case of a namespace repo, the KSA starts with the prefixns-reconcilerand could have a name likens-reconciler-[namespace]orns-reconciler-[repo_sync_name]. This can be checked using the commandkubectl get sa -A | grep ns-reconciler -
Once we have created the RepoSync object, proceed to attach the KSA to the GSA using the following command:
export RECONCILER=$(kubectl get sa -n config-management-system -o=custom-columns=name:.metadata.name | grep ns-reconciler) gcloud iam service-accounts add-iam-policy-binding \ --role roles/iam.workloadIdentityUser \ --member "serviceAccount:$PROJECT_ID.svc.id.goog[config-management-system/$RECONCILER]" \ $GSA@$PROJECT_ID.iam.gserviceaccount.com -
The KSA above will need the appropriate permissions within the cluster to CRUD resources in the cluster, such as managing deployments, services etc. This service account can be allocated a custom or a pre-defined Kubernetes Role or a ClusterRole (such as the omnipotent
admin- clearly a bad idea for production). In the root repo, create this yaml file to be synced as well.cat <<EOF > home/$TENANT_NAME/rolebinding-syncs-repo.yaml kind: RoleBinding apiVersion: rbac.authorization.k8s.io/v1 metadata: name: syncs-repo namespace: $TENANT_NAME subjects: - kind: ServiceAccount name: $RECONCILER namespace: config-management-system roleRef: kind: ClusterRole name: admin apiGroup: rbac.authorization.k8s.io EOF -
Check the status of the sync using the following command
nomos status
Add deployment artifacts to the tenant Git repo
This section is performed by an App owner, not an admin.
- Clone the tenant git repository that was created and supplied by the admin, into the cloud shell.
-
Add the following simple nginx deployment yaml to the repository in a new folder (that you create) called
manifests. Make sure there is nostatusfield in the deployment spec.cat <<EOF > manifests/deployment-nginx.yaml apiVersion: apps/v1 kind: Deployment metadata: creationTimestamp: null labels: app: nginx name: nginx namespace: $TENANT_NAME spec: replicas: 1 selector: matchLabels: app: nginx strategy: {} template: metadata: creationTimestamp: null labels: app: nginx spec: containers: - image: nginx name: nginx ports: - containerPort: 80 resources: {} EOF -
Create a yaml file to expose the nginx deployment using a Load balancer in the same
manifestsfolder. Make sure there is nostatusfield in the service spec.cat <<EOF > manifests/service-nginx.yaml apiVersion: v1 kind: Service metadata: creationTimestamp: null labels: app: nginx name: nginx namespace: $TENANT_NAME spec: ports: - port: 80 protocol: TCP targetPort: 80 selector: app: nginx EOF -
Add these changes, commit and push them to the repository.
- You should now be able to view the nginx deployment and the accompanying load balancer service deployed to the
tenant-1namespace in the cluster.
References
Doc Reference: [How to install Anthos Config Management](https://cloud.google.com/anthos-config-management/docs/how-to/installing-config-sync)
Multi-repo sync: [Getting started with Anthos Config Management - Config Sync](https://cloud.google.com/anthos-config-management/docs/config-sync-quickstart)
Multi-repo documentation: [Anthos Config Management - multi-repo sync](https://cloud.google.com/anthos-config-management/docs/how-to/multiple-repositories)
Repo types in ACM: [Anthos Config Management - repository types](https://cloud.google.com/anthos-config-management/docs/config-sync-overview#repositories)
Root-sync resource ref documentation: [Root-sync object reference document](https://cloud.google.com/anthos-config-management/docs/reference/rootsync-reposync-fields#configuring-source-type)