
Introduction
We love Kubernetes! We love developing apps, containerizing them and deploying them at scale! Here’s the thing though, writing a dockerfile and building new images can be monotonous and mundane, without much value add to the experience or the process. For an organization, if you’re planning on containerizing at scale, this could even be a choke point, a point of failure, or even a security risk. Also, in the container building process, one of the things that’s typically overlooked is the base image in your container image, you know the image name you provide in the FROM section in your dockerfile? Yup, this is typically that (probably, un-tested, CVE riddled) base image that developers picked up from hub.docker.com. This base image is being consumed by probably 100’s of containers running across a plethora of clusters and environments, running some fairly varying apps. So when an update to this base image is available, how do you get the 100’s of container’s using it to change?
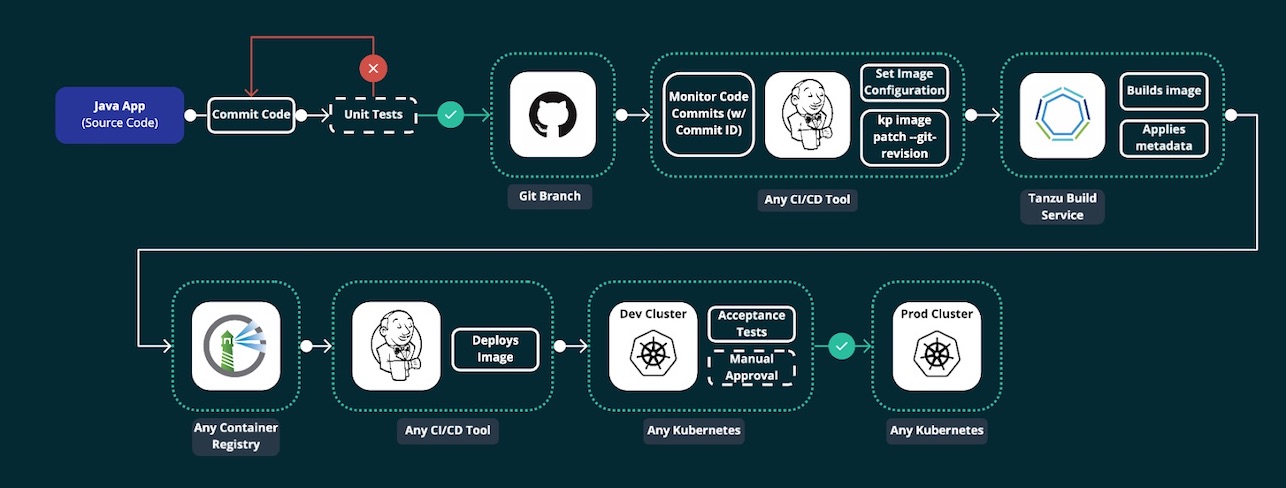
VMware’s Tanzu Build Service (v 1.0 as of this writing), takes your code (in a language it supports) and a target for the image repository where you want the image to be published to, and automatically creates an image out of it and pushes it to the target repo. It does all this inside a Kubernetes cluster (like a shared Operations Cluster) so it’s highly scalable, and doesn’t need you to manage and maintain a build server for the specific purpose.
Getting Started
Overview
Tanzu Build Service has is made up of multiple components like Buildpacks, Stacks, Builders and Stores - read more about them here
For more information on how Cloud Native Buildpacks, the component in TBS that builds the images, works, see here. In TBS, this happens inside a Kubernetes cluster, meaning that some special CRD’s need to be installed in a cluster in order for TBS to work.
Using TBS with dockerhub is fairly straight forward, I faced some challenges when trying with Harbor, so this blog considers using Harbor as the target image repository for all purposes (including TBS images).
Pre-requisites
-
Install Docker Desktop (for Windows or Mac)* – You will use it if the cluster you want to try TBS on a Kubernetes cluster on your local machine.
-
Create a Docker Hub account – This is where Tanzu Build Service will push your built images for you to pull down and run. It is also where you will push your Tanzu Build Service to build images during the install process.
-
Login credentials to network.pivotal.io to download Tanzu Build Service artifacts.
-
Install the kubectl CLI – You will use this CLI to manage your Kubernetes environment. Tanzu Build Service also uses your Kubernetes config file to connect and authenticate with your local cluster.
-
Install Carvel tooling (formally k14s) – You will use this set of tools (namely, kbld and ytt) during various points in the install process.
-
Harbor root CA certificate
Download Artifacts
-
Navigate to network.pivotal.io and login using your credentials.
- Download three Carvel CLIs for your operating system. These can be found on their respective Tanzu Network pages:
- kapp is a deployment tool that allows users to manage Kubernetes resources in bulk.
- ytt is a templating tool that understands YAML structure.
- kbld is tool that builds, pushes, and relocates container images.
-
Download the Build Service Bundle from the Tanzu Build Service page on Tanzu Network.
-
Unarchive the Build Service Bundle file:
tar xvf build-service-<version>.tar -C /tmp -
Download the kp CLI for your operating system from the Tanzu Build Service page on Tanzu Network.
-
Download the Dependency Descriptor file (descriptor-
.yaml) from the latest release on the Tanzu Build Service Dependencies page on Tanzu Network -
Get your harbor CA certificate by logging into Harbor, on the left hand side menu, navigate to Configuration, and then the System Settings tab on the top. Click on the
downloadbutton for the Registry Root Certificate. -
Here are the links to each Tanzu Network page in which users must accept the EULA:
Install TBS
- Assuming you already have your Kubernetes cluster and Harbor in place,
- point your current context to the cluster
kubectl config use-context <CONTEXT-NAME> - create a public project in Harbor, called
build-service. This is the project where the TBS dependency images will be placed. Let’s assume your harbor URL for the sake of this demo isharbor.myurl.com - create a public project in Harbor called
apps. This is the project where all your application images built by TBS will be pushed into.
Going forward, replace references to
harbor.myurl.comwith the FQDN to your harbor URL - point your current context to the cluster
-
Login to docker network registry
$ docker login registry.pivotal.io # You can use the same network.pivotal.io credentials -
Login to your harbor repository
$ docker login harbor.myurl.com -
Use
kbldto relocate the TBS images from pivotal network registry to harbor registry$ kbld relocate -f /tmp/images.lock --lock-output /tmp/images-relocated.lock --repository harbor.myurl.com/build-service/build-service -
Now that the images have been moved to your harbor registry, TBS needs to be installed into your kubernetes cluster. Note that since you’re installing using a private repository (harbor), the harbor root CA certificate needs to be provided as well during the install.
ytt -f /tmp/values.yaml \ -f /tmp/manifests/ \ -f ca.crt \ -v docker_repository="harbor.myurl.com/build-service/build-service" \ -v docker_username="admin" \ # Harbor username -v docker_password="MyPassword123" \ #Harbor Password | kbld -f /tmp/images-relocated.lock -f- \ | kapp deploy -a tanzu-build-service -f- -y # You can validate if the Kubernates custom resources have been installed in your target cluster using the following command $ kubectl api-resources --api-group kpack.io -
TBS dependencies (builders, stacks, buildpakcs etc.) need to be imported into the Kubernetes cluster. These dependencies are given in the dependency descriptor file we downloaded earlier.
$ kp import -f descriptor-<version>.yaml -
If all has gone well, you should now be able to verify the installation by checking for clusterbuilders installed in the cluster
$ kp clusterbuilder list # this should list a bunch of clusterbuilders in ready state if all has gone well -
Alternatively, you can do the following things in your cluster to verify
 # Check if the namespaces have been created
 $ kubectl get namespaces        # 2 new nemespaces kpack and build-service should be created

 #Check if all the pods in the namespaces are in proper order
 $ kubectl get po -n build-service       # All the pods should be in running state
 $ kubectl get po -n kpack       # All the pods should be in running state

 # List all custom resources
Creating your first image
-
You can create an image from source code located in a git repository, a blob store or your local machine. For the sake of this example, let’s use a public git repository with a sample spring application. PS: You don’t need to have the code on your machine.
-
Create a secret for the target image repository so that the builder can push the image into the repository
$ kp secret create harbor-secret --registry harbor.myurl.com --registry-user admin # you'll be prompted for the admin user password -
Create a K8s resource called
imageon the target cluster. This is a custom resource created by Tanzu build service.$ kp image create spring-petclinic --tag harbor.myurl.com/apps/spring-petclinic --namespace default --git https://github.com/spring-projects/spring-petclinic.git --git-revision main --wait # This creates a new image - TBS will trigger a new build of this image everytime the committed code changesAt this point, once the command finishes, the image will be available at
harbor.myurl.com/apps/spring-petclinic -
Check the status of the image and the build history
$ kp image status spring-petclinic # Status should be Ready $ kp build list spring-petclinic # Should have a single Successful build here $ kp build logs spring-petclinic # Logs for the most recent build -
You can also manually trigger a build without changing and pushing a new commit to the code
$ kp image trigger spring-petclinic # This will trigger a fresh build of the image using the code
Build Service auto-rebuilds images when one or more of the following build inputs change:
-
New buildpack versions are made available via updates to a Cluster Store.
- New Buildpack versions are made available on Tanzu Network.
- To update buildpacks, you must add new buildpack versions from Tanzu Network to a Cluster Store. See Updating Build Service Dependencies for more details.
-
There is a new commit on a branch or tag Tanzu Build Service is tracking.
-
There is a new Cluster Stack (ie. base OS image) available, such as full, tiny, or base.
- New Stack versions are made available on the Tanzu Build Service Dependencies page on Tanzu Network.
- You can get updates to Stacks from the Tanzu Network Registry by using the kp CLI. See Updating Build Service Dependencies for more details.
Conclusion
All in all, once past setting up TBS on your cluster, as a part of a probable first time CI/CD process, an image resource needs to be created for the application your intend to automate image building of.
With Tanzu Build Service, say goodbye to writing your Dockerfiles and say hello to automation!
> PS: You're still going to have to write your k8s yaml's so far. ;-)
The views and opinions expressed in this blog are mine, and do not represent VMware (or any associated legal entity/ organization’s) views, thoughts, or opinions. The blog is for informational purpose only, and it’s contents are made available as-is, without any official binding of SUPPORT and/ or WARRANTIES.