
This blog is Part 2 of Multi-region Cluster LoadBalancing using GKE. The 2 blogs share the same Setup.
Objectives
Take a deep breath, you’re going to need it! This is going to be long, but not difficult. Follow along, and you should be just… fine :-)
The following guide has been tested on Google CloudShell and may not work happily on Windows or Mac. Cloud Shell is FREE, so there really isn’t any good reason to not use it ;)
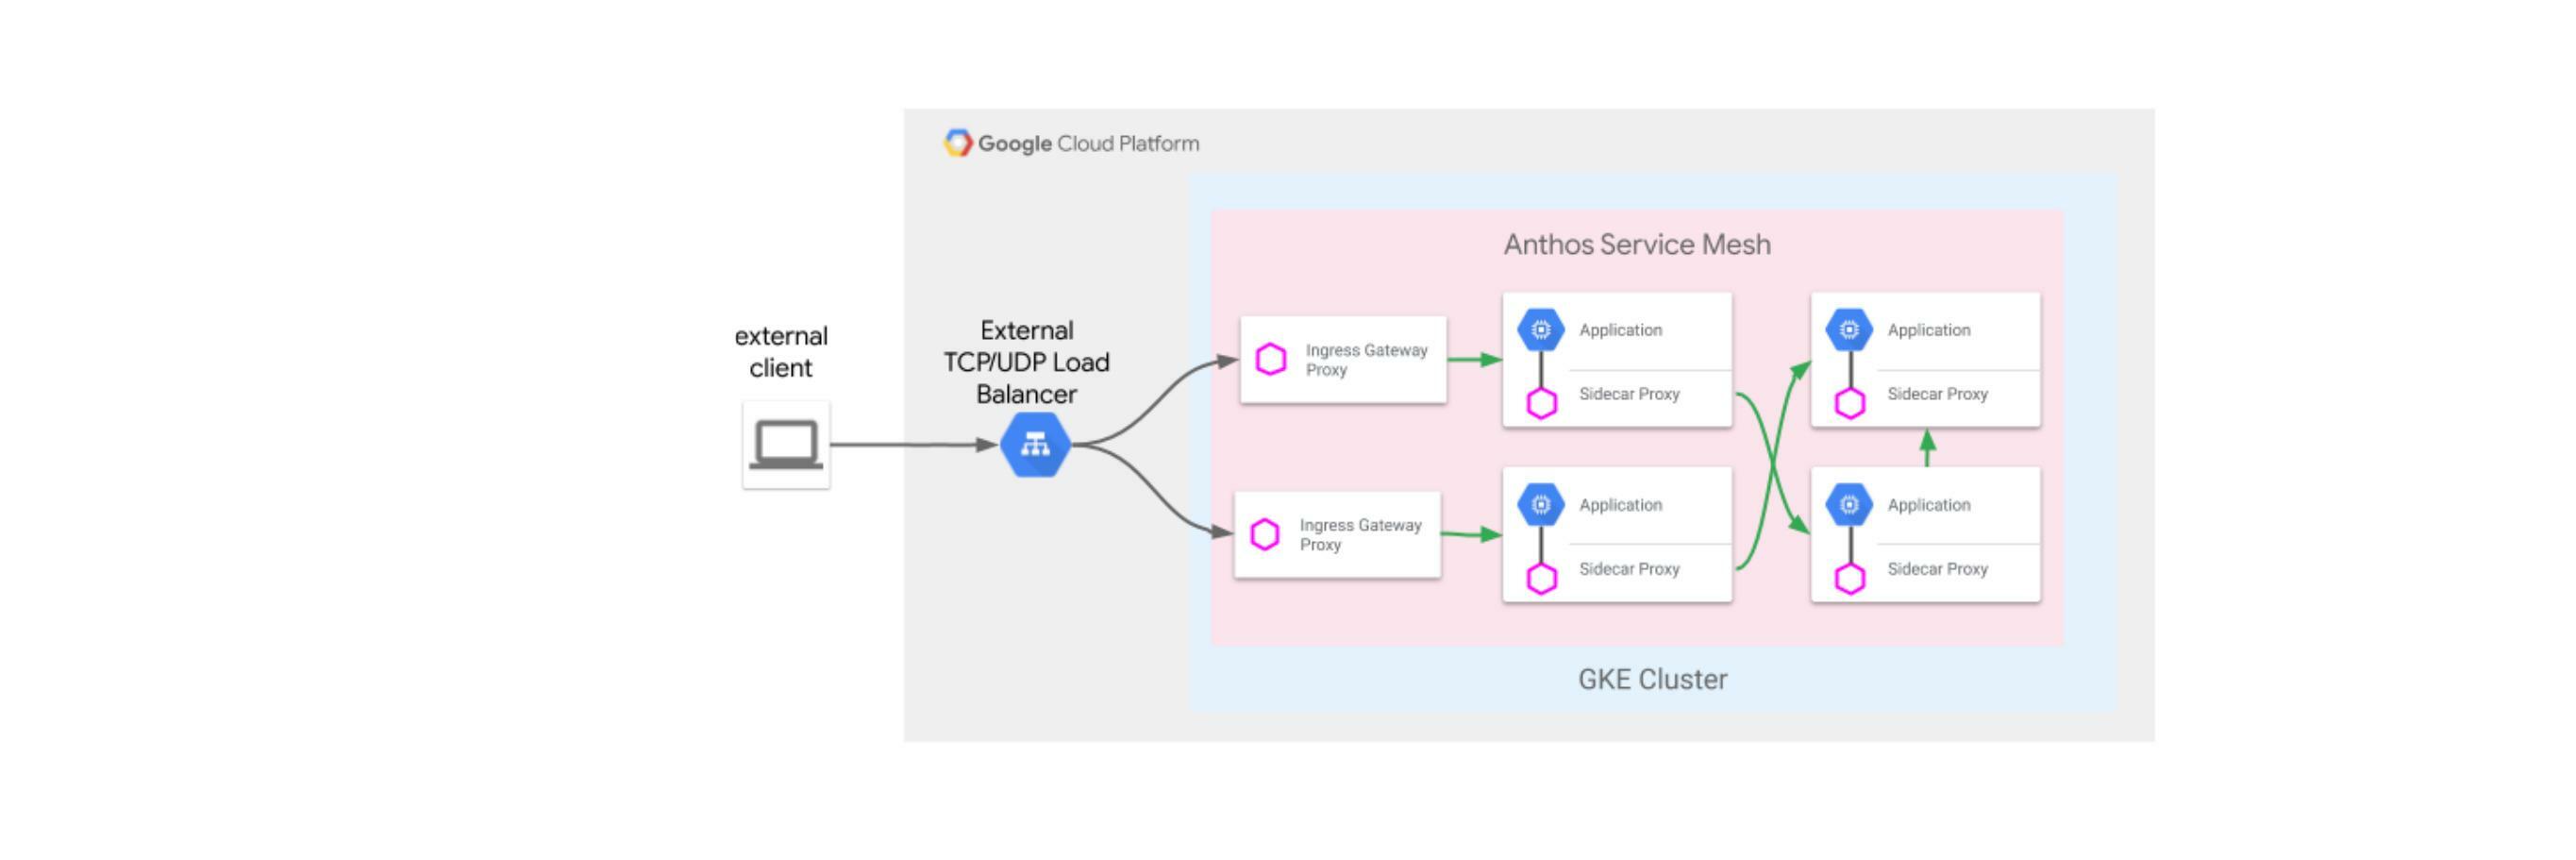
The objective is create a service mesh using multiple kubernetes clusters distributed around the globe, to host services for customers to consume. Here are a couple of things that should happen:
- Users coming from India should be redirected to the pods running closest to them. Users coming from Australia should be redirected to the clusters in Australia.
- Routing of services should be defined using a single ingress with a single public global IP address for internet incoming requests.
- Service Discovery and inter-cluster load-balancing should happen. If a service deployed across both the clusters is called by another service within either of the clusters, it should get responses from the common service deployed across both the clusters.
Scenario’s 1 and 2 can be accomplished using a Multi-cluster Ingress setup on GKE. Scenario 3 requires the use of Anthos Service mesh deployed across both the workload clusters. We need to meet the following Objectives:
Objective 1 - Setup multi-cluster ingress that uses a Global LB for load balancing and can do intelligent routing
Objective 2 - Setup multi-cluster mesh using ASM
A combination of both the Objectives is possible by using Multi-Cluster Ingress and Anthos Service Mesh together, but that is out of the scope of this document.
Setup
Assumptions
- Both the clusters are in the same GCP project
- Both the clusters are in the same GCP VPC
- Only the app-tier is considered for this demonstration
- This is not a production grade deployment by any means. This is only for experimenting and experiencing some of the capabilities offered by Anthos Service Mesh on Google Cloud.
- Workload Identity will be used to enable access between GCP resources instead of using GCP Service Accounts.
Environment Setup
This step is common across all 3 scenarios.
-
Create/ get access to a Project on GCP where you are the Administrator/ Owner. On the top left corner of the page, click on the project name, and copy the project ID.
-
Setup the Environment with a few variable that will be used extensively throughout.
export PROJECT_ID=<your-project-id> export WORKLOAD_POOL=${PROJECT_ID}.svc.id.goog export MESH_ID="proj-${PROJECT_ID}" export C1=cluster1 # name of the first cluster export R1=asia-southeast1 # Region for the first cluster to be deployed in export C2=cluster2 # name of the second cluster export R2=australia-southeast1 # Region for the se cluster to be deployed in mkdir asm-setup && export PROJECT_DIR=${PWD}/asm-setup gcloud config set project ${PROJECT_ID} -
Enable the Google Cloud API’s that will be required for these scenarios:
gcloud services enable \ --project=PROJECT_ID \ anthos.googleapis.com \ multiclusteringress.googleapis.com \ container.googleapis.com \ compute.googleapis.com \ monitoring.googleapis.com \ logging.googleapis.com \ cloudtrace.googleapis.com \ meshca.googleapis.com \ meshtelemetry.googleapis.com \ meshconfig.googleapis.com \ iamcredentials.googleapis.com \ gkeconnect.googleapis.com \ gkehub.googleapis.com \ cloudresourcemanager.googleapis.com \ stackdriver.googleapis.com -
Enable kubectl alias and auto completion - because, why not simplify when one can :)
 echo alias k=kubectl >> ~/.bash_profile
 echo source <(kubectl completion bash) >> ~/.bash_profile
 echo complete -F __start_kubectl k >> ~/.bash_profile
GKE Cluster Setup
Providing the zone while creating a cluster will make it a zonal cluster. If you want better HA and the wokrer nodes for your clusters to be distributed across the entire region (which hsa 3 or more zones), use the
--regionswitch to create a regional cluster.
-
Create 2 clusters in 2 different regions. DO NOT MISS ANY OF THE FLAGS MENTIONED IN THE COMMAND
 gcloud config set project ${PROJECT_ID}
 gcloud container clusters create ${C1} --region ${R1} --enable-ip-alias --workload-pool=${WORKLOAD_POOL} --mesh-id=${MESH_ID}
 gcloud container clusters create ${C2} --region ${R2} --enable-ip-alias --workload-pool=${WORKLOAD_POOL} --mesh-id=${MESH_ID}
Note: If you’re using pre-existing, pre-created clusters, you need to ensure that IP Aliases are enabled. On the GCP console, navigate to your cluster and check if VPC-native traffic Routing is enabled on the cluster.
Workload Identity is going to be used by Multi-cluster ingress to enable communication b/w the clusters. Check if the clusters you intend to setup for this demo have it enabled, by looking for the Workload Identity Feature to be enabled on the cluster. If it is not enabled,
 gcloud container clusters update <CLUSTER_NAME> \
 --project=${PROJECT_ID} \
 --workload-pool=${WORKLOAD_POOL} \
 --region <cluster-region>
For ASM to work, your clusters need to be labelled with the
mesh-idlabel. In case your clusters already exist and you only want to add the label to an existing cluster,gcloud container clusters update <CLUSTER_NAME> \ --project=${PROJECT_ID} \ --update-labels=mesh_id=${MESH_ID} \ --region <cluster-region> -
Add the credentials to access the clusters we’ve just created.
gcloud container clusters get-credentials ${C1} --region ${R1} gcloud container clusters get-credentials ${C2} --region ${R2} -
Make the context names more human readable
 kubectl config rename-context gke_${PROJECT_ID}_${R1}_${C1} ${C1}
 kubectl config rename-context gke_${PROJECT_ID}_${R2}_${C2} ${C2}
Objective 2: Multi-cluster mesh setup using ASM
Downloading the binaries
-
Update your shell
gcloud components update -
Download the latest version of ASM and the it’s SHA checksum
 curl https://storage.googleapis.com/csm-artifacts/asm/install_asm_1.10 > install_asm
 curl https://storage.googleapis.com/csm-artifacts/asm/install_asm_1.10.sha256 > install_asm.sha256
 sha256sum -c --ignore-missing install_asm.sha256
 chmod +x install_asm
Ensure that GCP API’s were enabled as per the Environment Setup process. Technically though, you can install ASM on the clusters and not enable the Anthos API’s as well, but that would hold back some of the other core Anthos features.
Setting up Anthos Service Mesh
-
Validate and install ASM on both the clusters
Installing on the first cluster
 ./install_asm \
 --project_id ${PROJECT_ID} \
 --cluster_name ${C1} \
 --cluster_location ${R1} \
 --mode install \
 --output_dir ${PROJECT_DIR} \
 --only_validate
Install the default ASM features
 ./install_asm \
 --project_id ${PROJECT_ID} \
 --cluster_name ${C1} \
 --cluster_location ${R1} \
 --mode install \
 --ca mesh_ca \
 --output_dir ${PROJECT_DIR} \
 --enable_registration \
 --enable_all \
 --enable_cluster_labels
Installing on the second cluster
 ./install_asm \
 --project_id ${PROJECT_ID} \
 --cluster_name ${C2} \
 --cluster_location ${R2} \
 --mode install \
 --output_dir ${PROJECT_DIR} \
 --only_validate
Install the default ASM features
./install_asm \ --project_id ${PROJECT_ID} \ --cluster_name ${C2} \ --cluster_location ${R2} \ --mode install \ --ca mesh_ca \ --output_dir ${PROJECT_DIR} \ --enable_registration \ --enable_all \ --enable_cluster_labels -
Check istio and ASM namespaces installation in both the clusters. If all went well, both the clusters should have namespace called
istio-systemandasm-systemand resources inside them.# Checking resources in Cluster1 k get all -n istio-system --context ${C1} k get all -n asm-system --context ${C1} # Checking resources in Cluster2 k get all -n istio-system --context ${C2} k get all -n asm-system --context ${C2} -
Add
istioctlCLI to PATHexport PATH=${PWD}/asm-setup/istio-1.10.2-asm.3/bin:$PATH -
In order for the ASM to load balance between pods deployed across both the clusters, trust needs to be established beween the 2 clusters. To do this, certificate for the first cluster needs to be installed in the second cluster and vice versa. This is called - configuring endpoint discovery between clusters
 # Generating remote secrets for Cluster 1 and installing into Cluster 2
 istioctl x create-remote-secret --context=${C1} --name=${C1} | kubectl apply -f - --context=${C2}

 # Generating remote secrets for Cluster 2 and installing into Cluster 1
 istioctl x create-remote-secret --context=${C2} --name=${C2} | kubectl apply -f - --context=${C1}
Without this step, while a common service across the 2 clusters will be setup, loadbalancing b/w services deployed on both the clusters will not happen.
Deploying an application to test ASM intra-cluster Load balancing
-
For applications deployed in the cluster to work with the service mesh, the Envoy sidecar would have to be deployed inside every pod for the application that we wish to do Service Mesh inside. In order for this to happen, sidecar injection will need to be enabled on the namespace in which the application is to be deployed. That is done by attaching a label on the namespace in which the application is going to be deployed.
We will need to get the value of the label that needs to be set on the namespaces. This can be run on either of the 2 clusters since both have ASM installed on them.
 k -n istio-system get po -l app=istiod --show-labels

 # Output
     NAME                                 READY   STATUS    RESTARTS   AGE   LABELS
 istiod-asm-1102-3-76b8d69bf9-dzpmj   1/1     Running   0          30m   app=istiod,istio.io/rev=asm-1102-3,istio=istiod
 istiod-asm-1102-3-76b8d69bf9-zf94t   1/1     Running   0          30m   app=istiod,istio.io/rev=asm-1102-3,istio=istiod
From the label column, note the value after
istio.io/rev=, which isasm-1102-3in this case. Exporting it as a variable would make life easier.export ASMV=asm-1102-3 -
Create a namespace for the test application and label it so that Envoy injection can happen when we deploy the application
 for CTX in ${C1} ${C2}
     do
         kubectl create --context=${CTX} namespace sample
         kubectl label --context=${CTX} namespace sample \
         istio-injection- istio.io/rev=${ASMV} --overwrite
     done
You can check if the labelling has happened properly using the following command, and looking at the labels column in the output.
k get ns sample --show-labels --context ${C1} k get ns sample --show-labels --context ${C2} -
Deploy the
helloworldkubernetes service to both the clusters, followed by the v1 and v2 deployment to individual clusters# deploying the service and the v1 deployment to the first cluster k create --context=${C1} -f ${PROJECT_DIR}/istio-1.10.2-asm.3/samples/helloworld/helloworld.yaml -l service=helloworld -n sample k create --context=${C1} -f ${PROJECT_DIR}/istio-1.10.2-asm.3/samples/helloworld/helloworld.yaml -l version=v1 -n sample # deploying the service and the v1 deployment to the first cluster k create --context=${C2} -f ${PROJECT_DIR}/istio-1.10.2-asm.3/samples/helloworld/helloworld.yaml -l service=helloworld -n sample k create --context=${C2} -f ${PROJECT_DIR}/istio-1.10.2-asm.3/samples/helloworld/helloworld.yaml -l version=v2 -n sample
Testing intra-cluster load Balancing
The way we can test this is by creating a pod called sleep - which does exactly what the name suggests -, in both clusters, and use it to call the helloworld service. Since the helloworld service is being loadbalanced by ASM, the sleep service will get responses from both, cluster1 and cluster2 - which will show in the response as the version of the helloworld service.
-
Deploying the sleep service in both the clusters
 for CTX in ${C1} ${C2}
 do
     kubectl apply --context=${CTX} \
     -f ${PROJECT_DIR}/istio-1.10.2-asm.3/samples/sleep/sleep.yaml -n sample
 done
Test if the sleep pods have been deployed successfully by running the following
k -n sample get po,svc --context ${C1} k -n sample get po,svc --context ${C2} -
Testing the outcome. The following command will run a curl command to call the helloworld service in the sample namespace, on port 5000 from inside the sleep container deployed on cluster1, and then do the same thing from the sleep containainer deployed in cluster2. Either way the desired outcome is that helloworld containers deployed on but the clusters (demarkated as v1 and v2), should both reply to the request.
You’ll have to run the commnd for cluster 1 multiple time to see the responses coming from different versions, and the same for cluster 2.
 # Curl from sleep container in Cluster1
 kubectl exec -it --context="${C1}" -n sample -c sleep \
 "$(kubectl get pod --context="${C1}" -n sample -l \
 app=sleep -o jsonpath='{.items[0].metadata.name}')" \
 -- for i in `seq 1 20`; do curl -sS helloworld.sample:5000/hello; done

 # Curl from sleep container in Cluster2
 kubectl exec --context="${C2}" -n sample -c sleep \
 "$(kubectl get pod --context="${C2}" -n sample -l \
 app=sleep -o jsonpath='{.items[0].metadata.name}')" \
 -- curl -sS helloworld.sample:5000/hello
And voila! you’ve just tested Multi-cluster Ingress and multi-cluster Service Mesh on Google Cloud! That wasn’t so tough now, was it?