
Objectives
Take a deep breath, you’re going to need it! This is going to be long, but not difficult. Follow along, and you should be just… fine :-)
The following guide has been tested on Google CloudShell and may not work happily on Windows or Mac. Cloud Shell is FREE, so there really isn’t any good reason to not use it.
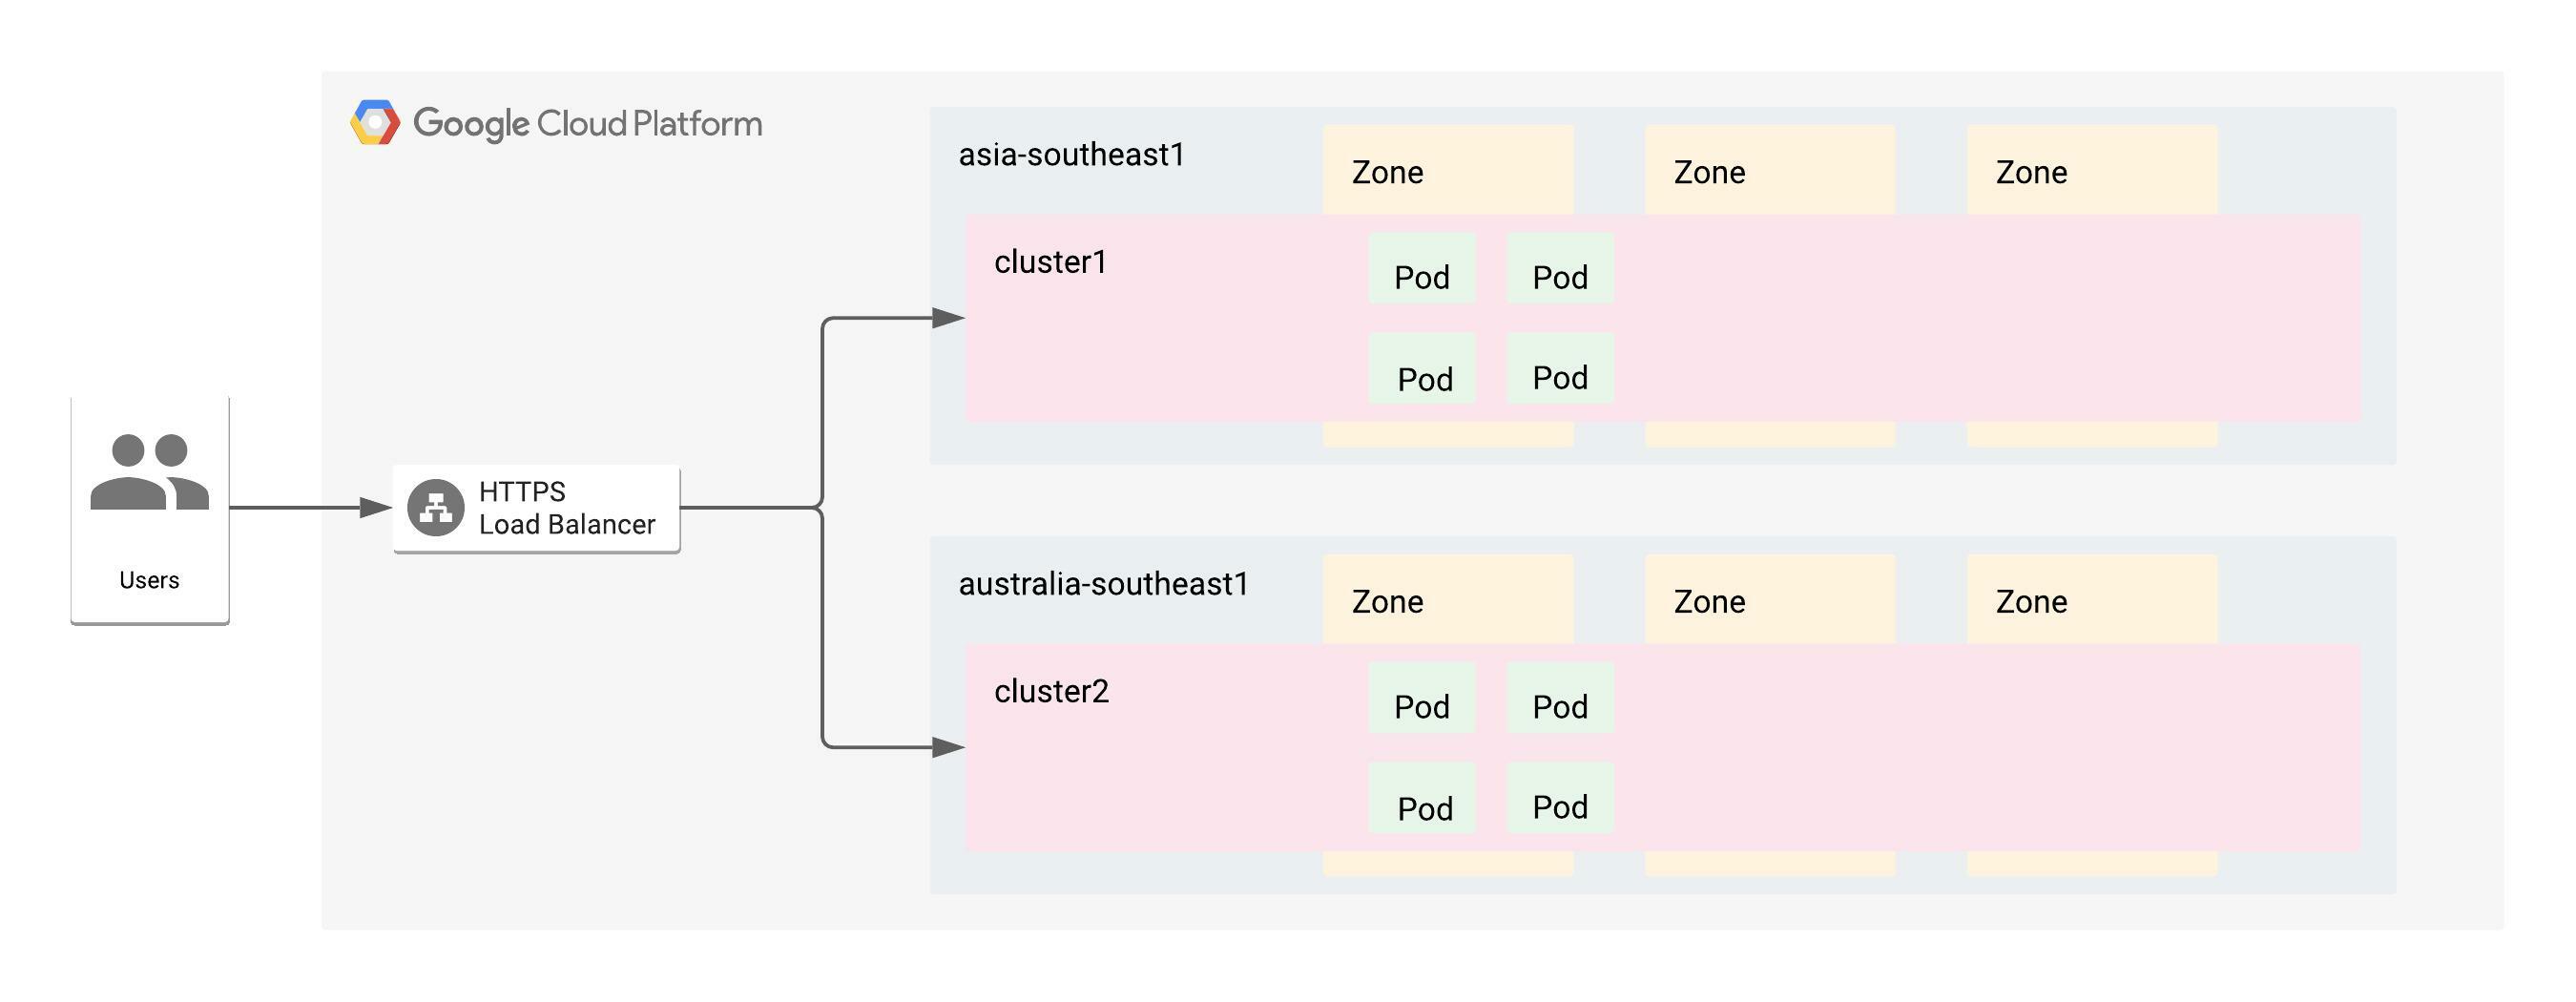
The objective is create a service mesh using multiple kubernetes clusters distributed around the globe, to host services for customers to consume. Here are a couple of things that should happen:
- Users coming from India should be redirected to the pods running closest to them. Users coming from Australia should be redirected to the clusters in Australia.
- Routing of services should be defined using a single ingress with a single public global IP address for internet incoming requests.
- Service Discovery and inter-cluster load-balancing should happen. If a service deployed across both the clusters is called by another service within either of the clusters, it should get responses from the common service deployed across both the clusters.
Scenario’s 1 and 2 can be accomplished using a Multi-cluster Ingress setup on GKE. Scenario 3 requires the use of Anthos Service mesh deployed across both the workload clusters. We need to meet the following Objectives:
Objective 1 - Setup multi-cluster ingress that uses a Global LB for load balancing and can do intelligent routing
Objective 2 - Setup multi-cluster mesh using ASM
A combination of both the Objectives is possible by using Multi-Cluster Ingress and Anthos Service Mesh together, but that is out of the scope of this document.
Setup
Assumptions
- Both the clusters are in the same GCP project
- Both the clusters are in the same GCP VPC
- Only the app-tier is considered for this demonstration
- This is not a production grade deployment by any means. This is only for experimenting and experiencing some of the capabilities offered by Anthos Service Mesh on Google Cloud.
- Workload Identity will be used to enable access between GCP resources instead of using GCP Service Accounts.
Environment Setup
This step is common across all 3 scenarios.
-
Create/ get access to a Project on GCP where you are the Administrator/ Owner. On the top left corner of the page, click on the project name, and copy the project ID.
-
Setup the Environment with a few variable that will be used extensively throughout.
export PROJECT_ID=<your-project-id> export WORKLOAD_POOL=${PROJECT_ID}.svc.id.goog export MESH_ID="proj-${PROJECT_ID}" export C1=cluster1 # name of the first cluster export R1=asia-southeast1 # Region for the first cluster to be deployed in export C2=cluster2 # name of the second cluster export R2=australia-southeast1 # Region for the se cluster to be deployed in mkdir asm-setup && export PROJECT_DIR=${PWD}/asm-setup gcloud config set project ${PROJECT_ID} -
Enable the Google Cloud API’s that will be required for these scenarios:
gcloud services enable \ --project=PROJECT_ID \ anthos.googleapis.com \ multiclusteringress.googleapis.com \ container.googleapis.com \ compute.googleapis.com \ monitoring.googleapis.com \ logging.googleapis.com \ cloudtrace.googleapis.com \ meshca.googleapis.com \ meshtelemetry.googleapis.com \ meshconfig.googleapis.com \ iamcredentials.googleapis.com \ gkeconnect.googleapis.com \ gkehub.googleapis.com \ cloudresourcemanager.googleapis.com \ stackdriver.googleapis.com -
Enable kubectl alias and auto completion - because, why not simplify when one can :)
 echo alias k=kubectl >> ~/.bash_profile
 echo source <(kubectl completion bash) >> ~/.bash_profile
 echo complete -F __start_kubectl k >> ~/.bash_profile
GKE Cluster Setup
Providing the zone while creating a cluster will make it a zonal cluster. If you want better HA and the wokrer nodes for your clusters to be distributed across the entire region (which hsa 3 or more zones), use the
--regionswitch to create a regional cluster.
-
Create 2 clusters in 2 different regions. DO NOT MISS ANY OF THE FLAGS MENTIONED IN THE COMMAND
 gcloud config set project ${PROJECT_ID}
 gcloud container clusters create ${C1} --region ${R1} --enable-ip-alias --workload-pool=${WORKLOAD_POOL} --mesh-id=${MESH_ID}
 gcloud container clusters create ${C2} --region ${R2} --enable-ip-alias --workload-pool=${WORKLOAD_POOL} --mesh-id=${MESH_ID}
Note: If you’re using pre-existing, pre-created clusters, you need to ensure that IP Aliases are enabled. On the GCP console, navigate to your cluster and check if VPC-native traffic Routing is enabled on the cluster.
Workload Identity is going to be used by Multi-cluster ingress to enable communication b/w the clusters. Check if the clusters you intend to setup for this demo have it enabled, by looking for the Workload Identity Feature to be enabled on the cluster. If it is not enabled,
 gcloud container clusters update <CLUSTER_NAME> \
 --project=${PROJECT_ID} \
 --workload-pool=${WORKLOAD_POOL} \
 --region <cluster-region>
For ASM to work, your clusters need to be labelled with the
mesh-idlabel. In case your clusters already exist and you only want to add the label to an existing cluster,gcloud container clusters update <CLUSTER_NAME> \ --project=${PROJECT_ID} \ --update-labels=mesh_id=${MESH_ID} \ --region <cluster-region> -
Add the credentials to access the clusters we’ve just created.
gcloud container clusters get-credentials ${C1} --region ${R1} gcloud container clusters get-credentials ${C2} --region ${R2} -
Make the context names more human readable
 kubectl config rename-context gke_${PROJECT_ID}_${R1}_${C1} ${C1}
 kubectl config rename-context gke_${PROJECT_ID}_${R2}_${C2} ${C2}
Objective 1: Multi-cluster ingress/ Global LoadBalancing
You do not need Anthos Service Mesh or Istio in order for this to work. It uses something known as Network Endpoint Groups to route traffic from the LB directly to the Pods.
In order for Global Load Balancing to work, GCP can provide us with a random Static IP address that is ephemeral to the life of the Load Balancer. When the load balancer, is deleted, the static Ip address will also be released. Optionally, one can create a static IP reservation, which will give us a static IP which will not be released till one doesn’t manually delete it. We can then use this static IP as the Load balancer IP and connect it to the FQDN for our eventual website.
IMPORTANT: The way Anthos for multi-cluster works, is by adding clusters to a hub (this is the gkehub api we enabled earlier). For Multi-cluster Ingress, while ALL THE CLUSTERS where your workloads will be running, the data plane, need to be added to the hub, but ONLY ONE of the clusters must be made the Configuration Cluster. Keep this in mind when configuring the Configuration Cluster.
-
Create a global static Ip address for the Global LB (HTTP LB)
gcloud compute addresses create glb-ip --global # Note the external IP address created here. If you're not able to see the IP, wait for a couple of minutes before trying gcloud compute addresses list --global export GCLB_IP=<paste-static-ip-here> # export the static IP you created as an environment variable. -
Create a DNS entry that links the URL that users will use to access your application, with the GCLB_IP. Note that this creates a cloud Endpoint, and does not use the Cloud DNS service from GCP.
YAML is extremely sensitive to spaces, so be mindful of the formatting.
 cat <<EOF > dns-spec.yaml
 swagger: "2.0"
 info:
     description: "Cloud Endpoints DNS"
     title: "Cloud Endpoints DNS"
     version: "1.0.0"
 paths: {}
 host: "frontend.endpoints.${PROJECT_ID}.cloud.goog"
 x-google-endpoints:
 - name: "frontend.endpoints.${PROJECT_ID}.cloud.goog"
     target: "${GCLB_IP}"
 EOF

 gcloud endpoints services deploy dns-spec.yaml
Reference: https://cloud.google.com/kubernetes-engine/docs/how-to/multi-cluster-ingress-setup#requirements_for
-
The clusters need to be added to the hub.
 # Adding the first cluster to the hub
 gcloud container hub memberships register ${C1} \
     --project=${PROJECT_ID} \
     --gke-uri=${R1}/${C1} \
     --enable-workload-identity

 # Adding the second cluster to the hub
 gcloud container hub memberships register ${C2} \
     --project=${PROJECT_ID} \
     --gke-uri=${R2}/${C2} \
     --enable-workload-identity

 # Confirm that both the clusters have been added to the hub
 gcloud container hub memberships list --project={PROJECT_ID}
Both the clusters should be visible as members of the hub.
-
Once done, we have to select one of the clusters as the config cluster. This will house the MultiClusterIngress and MultiClusterService resources. Only 1 cluster in a fleet can be an active config cluster
 gcloud beta container hub ingress enable \
 --config-membership=projects/${PROJECT_ID}/locations/global/memberships/${C1}

 # Confirm cluster registration as the config cluster
 gcloud beta container hub ingress describe
If all is running well, we can now deploy the zoneprinter application, and test the setup.
-
Creating the application deployment and namespace resources ON BOTH CLUSTERS
Create a file called zoneprinter.yaml and write the following contents into it
 apiVersion: v1
 kind: Namespace
 metadata:
   name: zoneprinter
 ---
 apiVersion: apps/v1
 kind: Deployment
 metadata:
 name: zone-ingress
 namespace: zoneprinter
 labels:
     app: zoneprinter
 spec:
 selector:
     matchLabels:
     app: zoneprinter
 template:
     metadata:
     labels:
         app: zoneprinter
     spec:
     containers:
     - name: frontend
         image: gcr.io/google-samples/zone-printer:0.2
         ports:
         - containerPort: 8080
Apply them to the clusters
k apply -f zoneprinter.yaml --context ${C1} k apply -f zoneprinter.yaml --context ${C2} -
Verify that all the pods are running in the namespace in both the clusters.
k get deploy -n zoneprinter --context ${C1} k get deploy -n zoneprinter --context ${C2} -
On the Config cluster, installing the Multi-cluster Service. This will create a headless cluster IP service for the zoneprinter application in both the clusters.
Create a yaml file called
mcs.yamlwith the following contentsapiVersion: networking.gke.io/v1 kind: MultiClusterService metadata: name: zone-mcs namespace: zoneprinter spec: template: spec: selector: app: zoneprinter ports: - name: web protocol: TCP port: 8080 targetPort: 8080# Switch context to the config cluster k config use-context ${C1} k apply -f mcs.yaml -
Wait a couple of minutes and validate headless service creation in both the cluster. You should see a
ClusterIPService in each of the clusters.k get svc -n zoneprinter --context ${C1} k get svc -n zoneprinter --context ${C2} -
The moment of truth, deploying the
MultiClusterIngresswill create the HTTP(S) Loadbalancer service that will bring all of this together.This step also needs to be done in the config cluster, meaning context
${C1}. Ensure you completed Step 1. of this objective, where you set theGCLB_IPenvironment variable.cat <<EOF > mci.yaml apiVersion: networking.gke.io/v1 kind: MultiClusterIngress metadata: name: zone-ingress namespace: zoneprinter annotations: networking.gke.io/static-ip: ${GCLB_IP} spec: template: spec: backend: serviceName: zone-mcs servicePort: 8080 EOF k apply -f mci.yaml -
Wait a couple of minutes while the configuration gets setup. There are many ways to check if the configuration has completed successfully.
k get mci zone-printer -n zoneprinter -o=jsonpath={.status.VIP} # this should prin the static IP we created earlier, meaning that the app is deployed. k describe mci zone-printer -n zoneprinter # Use this to see the events and debug if the previous command doesn't print the VIP. -
The website should now be available at
gcloud endpoints services list --format="value(serviceName)"If the website is not available, run a
k describe mciand check the events and any possible errors in the MCI object -
Validating - Test the services from different regions using your local broswer as well as https://geotargetly.com/geo-browse
And Voila.. Post for Objective 2 here… The same setup is used for this second part as well.
PS: Any thoughts or opinions expressed in this blog are solely mine and have no relation to Google’s thoughts or point of views.